
A D-Link DSR-250 router protects your home network by blocking unwanted incoming internet connections and acting as a basic firewall. Sometimes you need to open a port in your router in order to get a good connection for a game or to use a specific device on your network. The DSR-250 lets you choose the applications that are allowed to connect through an open port. By opening a port in your router you allow a specific application or game to send data from the internet to your home network.
The following steps will show you how to open ports on the D-Link DSR-250 router:
- Set up a static IP address on the computer or device that you are forwarding ports to.
- Login to your D-Link DSR-250 router.
- Find the Custom Services section in your D-Link DSR-250 router.
- Find the Security tab at the top of the screen and click on it.
- Click on Custom Services.
- Create a Custom Services entry.
- Navigate to the Firewall Rules section in your D-Link DSR-250 router.
- Find the Security tab at the top of the screen and click on it.
- Click Firewall Rules.
- Go ahead and create a Firewall Rules entry.
If this sounds difficult, you are not alone. We will walk you through each step in opening a port for the D-Link DSR-250 router.
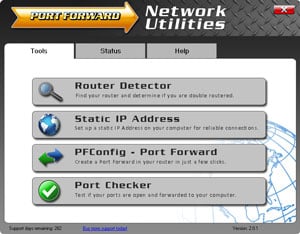
We think that forwarding a port should be easy. That's why we created Network Utilities. Our software does everything that you need to forward a port.
When you use Network Utilities you get your port forwarded right now!
Step 1 - Setup A Static IP Address
In order to keep the ports in your router open, even after a reboot or disconnect, it is important to set up a static IP address in the device that you are forwarding a port to.
-
Recommended - Our free program will setup a static IP address for you.
â Download Network Utilities today!
-
Or follow our Static IP Address guides to setup a static IP address.
After setting up a static ip address on your devices you need to login to your router.
Step 2 - Login To Your D-Link Router
The D-Link DSR-250 router uses a web interface to display router settings. In order to login to the D-Link DSR-250 router you need to use a web browser.
Open your favorite web browser. If you don't have a favorite or are not sure what this means, open up Chrome, Firefox, or Edge. If you are already in a browser window, go ahead and open up a new tab.
We have simplified this step for you with this link: Login to your DSR-250 Router
Find the address bar in your browser window. This is usually found at the top of the page, like in the image below.
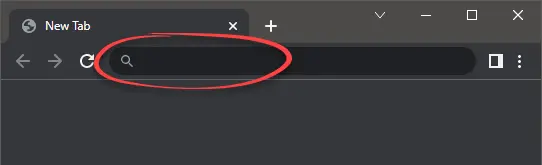
Above is an example of what a web browser address bar looks like. Find the address bar in your router and type in your router's IP address.
To forward a single port, enter the port number into the Source Start Port and the Source Finish Port boxes. To forward a range of ports, enter the lowest number in the range into the Source Start Port box. Then enter the highest number in the range into the Source Finish Port box.
Then go ahead and take the values that you entered in the Source Port boxes and put the exact same numbers in the Destination Port boxes.
- Select the Multiple Ports option to forward a List of ports.
Enter the list of ports you want to forward, separated by a comma, in to both the Source Ports and the Destination Ports boxes. An example would like something like: 1000,2000-3000,4000
- When you're done filling things out, click on the button labeled Save.
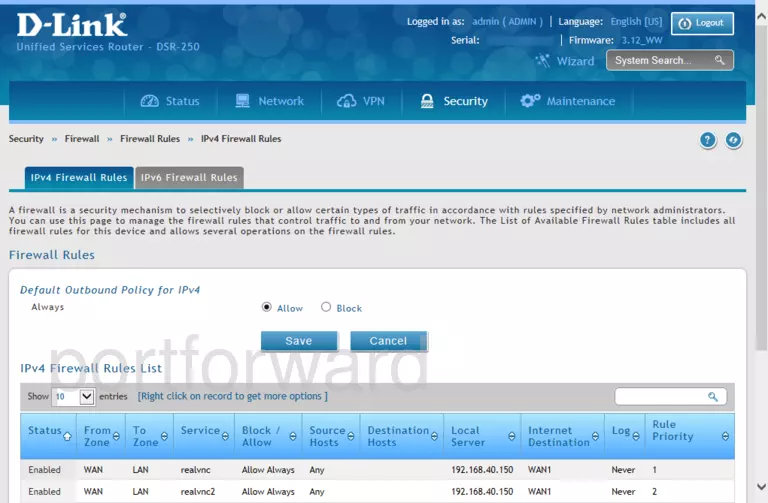
Step 5 - Navigate to the Firewall Rules Section
Now that you've created your Custom Services, you'll need to allow them through the Firewall. Go ahead and head over to the Firewall Rules section now.
- Click on the Security tab, which is at the top of the screen.
- Click Firewall Rules.
You should now be on a page that says Firewall Rules.
Step 6 - Create a Firewall Rules Entry
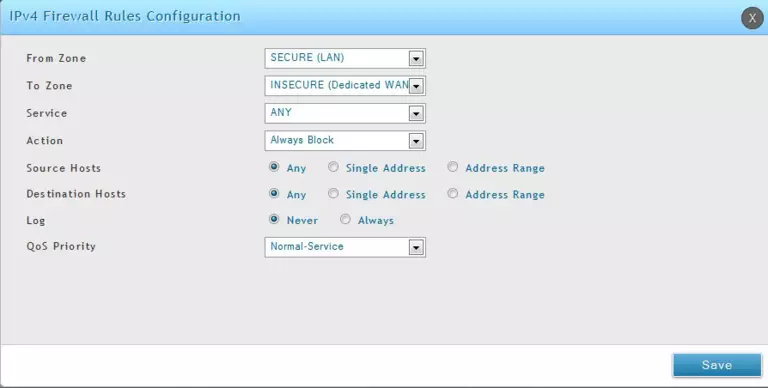
You should be by default, but if you're not then make sure you're on the IPv4 Firewall Rules tab.
-
Click on the Add New IPv4 Firewall Rule button.
-
Choose INSECURE (WAN) from the From Zone drop-down box. If you have more than one WAN option, you'll need to pick the one that applies to your internet connection.
-
Choose SECURE (LAN) from the To Zone drop-down list.
-
Select the custom service you created in earlier from the Service dropdown menu.
-
For the Source Hosts, click on the radio button that says Any.
-
For the Destination Hosts, click on the Single Address radio button. Then, go ahead and enter the IP address that you are forwarding ports to into the Destination Hosts box. It is possible for this to be either the IP address of your computer or of any other device on your network that you want ports forwarded to.
-
Whether you want to Log things or not is up to you, but typically most leave this on Never.
-
The QoS Priority is also up to you, but Normal-Service is suitable for most.
-
After you've finished configuring things here, click the Save button.
Test If Your Ports Are Open
Finally, I strongly recommend testing to see if you forwarded the D-Link DSR-250 ports correctly. To do this you can use our Network Utilities tool, which includes a free Open Port Checker. Open Port Checker is the only online port checking tool that has Guaranteed Results.
More Guides To Check Out:
- We have software that does all of this and more called Network Utilities.
- Learn how to Setup your router.
- A full list of games and applications that require port forwarding.


